Showing posts with label Castle ruins. Show all posts

Thursday, 27 December 2012

Vorsteck in ruins

The final part of Vorsteck was an area of derelict buildings, where the stone buildings had collapsed. Of course if I was making a display version I’d include a lot more rubble, and if these buildings were external then grass and vegetation would have been added but these were more the war torn results of previous invasions for the old city.


I suspect nasty things would have lived there ready to pounce from the ruins at us as we passed through.

These ruins were built in the basic same way as the main buildings, that being foam board covered in DAS putty hand made tiles to look like stone blocks, with the exception of the arch way which was covered in putty but had brick work etched in before it dried.


The main difference being that instead of full squared buildings they were just slithers of half walls, and cross ways and T shapes designed to look like exposed interior walls.


Some of the earlier pieces that became the ruined castle were originally made for the Vorsteck layout.


Combined with some elements from the ruined castle set the old town would have been quite a scary place to visit.

NEXT : Test layout photos

Thursday, 5 January 2012

Review 2011 or The Story So Far...

Good old BigLee, he’s already reviewed last year, made resolutions for this year and prompted us to vote in the blog awards, me - well  - I’m playing catch up. It’s almost a year since I started this blog, early February actually so not quite at my first anniversary yet. However I‘d like to take this moment to thank those that passed by, dropped in and said hello and maybe even stuck around for a blog or two.

This blog has certainly been an extra driving force for me to try out new ideas and whilst surfing other blogs I’ve seen many other great ideas I wish to try out, but the problem - there is just never enough time.  I’ve managed to get quite a lot done last year, but I’ve still got many unfinished projects hanging around which I really do need to get finished before I start anything else.

Let’s see, a quick round up. The ghost town I’m building out of coffee sticks has four finished models, one awaiting varnish and a sixth one almost completed as far as the coffee sticks go. 

This one has not been featured yet and is another attempt at making the model out of all recycled materials – an old pizza box, a dessert box and a toilet roll forming the base with the coffee sticks around the outside. These are ok once the sticks are on and the glue is dry, but during construction they really do feel very flimsy. I’m also experimenting with the Quality Street coloured transparent wrappers to give creepy light in the windows on this one. (The toilet roll is to add stability on the inside - Photos coming soon I promise).

A couple of country cottages and town houses were completed, but the one based on Zandina’s house has not progressed since the last time it was featured. I ran out of space to have all these models lying around, and when I had guests over they had to be boxed up and not all of the models have made it back out yet. This is also true for the remainder of the work on the ruined castle pieces. Some of these I also wanted to base up and add grass and some foliage to as well. 


However, before I do that some pieces are supposed to play a role in one of our D&D games, but we haven’t reached that part in the campaign yet despite having planned this out with our GM over a year ago now. See some of BigLee’s posts for the saga of our rather on and off attempts at completing this campaign.

The ghost town and the graveyard pieces are for a campaign I’m planning myself, and I hope to get some actual work done on that this year, and you never know maybe even play some of it. This is a campaign based on the TV Series Supernatural using the role play mechanism by Jamie Chambers and published by MargaretWeis Productions Ltd. It does mean I need to spend some more time reading, making notes and trying to develop actual plot ideas rather than spend weekends model building. 


Maybe I should do this part now whilst the weather is less than friendly, as due to space restrictions I don’t really have the room inside to model build so easily. I also have a whole pile of figures to be painted for this campaign as well, however as there is a remote possibility that one or more of my potential players may be reading this I’m my fingers still as to what these figures actually are, let’s just say some of them come from the excellent workshop that is Heresy Miniatures.

The Doctor Who Tapestry came out to play again, I hope to get as much done as possible, but finding source photos to reference some older stories is proving a bit of problem at the moment. 


Another problem I hope to overcome very soon is the book Karl, Birth of Mystery. My publisher has been somewhat lacking in effort this year, and I think he’ll be getting a new year’s kick up the backside very soon. I will keep anyone who has placed an outstanding order up to date personally with developments – and I hope to have some news in the next week or so once production ramps up again.


Thanks for the support and well, let’s see what 2012 brings. 

Sunday, 14 August 2011

Project Update

Apologies for the lack of updates last week, got a bit distracted last weekend with one thing and the other, including a washing machine that decided to smoke the clothes rather than clean them. New one being delivered next week, you never know there might be some interesting packaging to go with it.

 Here are the latest updates from the workbench.

Thatched Cottage Pub

The base for the thatched cottage that got too wet was a bit beyond repair, so I peeled the top layer off and glued this to a new base made in the same way to the original. Now I need to repair some bald patches on the base, before adding extra colour and texture to the ground. I have started to build a small wooden fence around the outside of the pub grounds using the coffee sticks, and incorporated an interesting piece of twig I found to make a felled tree trunk.


Castle Ruins

I’ve started to paint up the entrance to the castle ruins; this is basically using white and black paint mixed in varying shades of grey and neat white. I’ve also added more stone work to the remains of the room. I wasn’t going to brick up the entire underside, but some parts seen at the wrong angle will show up the bare polystyrene so I will have to make sure the underside walls are covered at least.


The plastic pieces of a ruined church I got from BigLee a few years back which I tried to fill and paint then left for dead have been resurrected. I’ve stuck the piece as was onto a new larger piece of base card to extend the ground work and used some of my current ready mix wall filler to soften the plastic edges and fill the gaps to take the straight, square edges off. I’ve also glued a piece of the polystyrene covered broken wall from the castle set to the base.


I’ve been re-watching the first series of Vampire Diaries, and the old ruined church set where the vamps were locked away has given me some idea as to what I want to do with this piece now. Plenty of greenery and sticking up boulders and stones, the graveyard part of it I’ll keep for a later project. I’ve a few plans for an old graveyard layout.

Plus I've added the town houses to Gallery Page.

Sunday, 31 July 2011

Project Roundup July

Bit of a random blog today I’m afraid, not had a lot of time this weekend for model work, but I thought I’d take the opportunity to round up where some of the projects are at.


Castle Ruins

Not much advanced this month, although the main piece has now had the last of the exterior walls finished, by that I mean covered in wall filler and marked out. There is a small amount of interior work to be completed and some under side work before I start painting. The tunnel entrance way is still undercoated black with no further development. Once the main piece has caught up I’ll paint them all up together.


I’ve been having a rummage in some old boxes, and discovered two things of interest. One piece which comes under this category of ruins is a plastic model piece of aches and windows, which BigLee passed over to me a number of years ago, having decided it wasn’t quite right for the battle table he was putting together and wondered what I could do with it. I think it looked just too plastic, and was really just a front piece, being that it was not even finished on both sides. I tried filling it and painting it, but couldn’t quite get a result either – it went into the ‘deal with this later’ box.  This is how it looks now, I’m going to see what I can do to bring it to life - watch this space.


Scenic Layout

Whilst rummaging I also pulled out a small hillside that I remember making with dad when I was a kid for the model train set. This went into the far corner of the board to make the layout look like it was in a small valley. It was built on a chicken wire frame, covered in sack cloth and papier-mâché, and then painted. It’s suffered a bit over time; I think it’s time it got freshened up and incorporated into my current fantasy layout.


Miltonburg Town

Speaking of the layout, I took some time this month to lay out the larger houses and village pub which I recently built along with some figures and tables which I had built from coffee sticks some time ago for another campaign. This campaign saw me furnish an entire inn interior from bar, stairs, tables, fireplace and bedrooms. Most of the small pieces have survived to be used again. 


Whilst I’m on the subject of my fictional town Miltonburg, a small amount of work has been added to Zandina’s townhouse. 


The baseboard for the pub that got a good soaking thanks to the stormy weather we had a few weeks ago is currently under attempted repair. 


Originally I had cut two sides of the Sol box (see previous posting) and stuck them together twisted at 90 degrees to each other so that the grain of the corrugated cardboard went across each piece, this I had hoped would give the base more stability when gluing on it, to prevent it curling up – but I think the amount of rain has banished any hope of a perfectly flat base.  I’ve re-glued the base and it’s currently being held together. We’ll see.

Sunday, 26 June 2011

Project Round Up


I thought I’d give a quick round up of some of the projects I’ve been working on. I realised that it’s been a while since I posted anything about the castle ruins. These have been taking a bit of a back seat recently but haven’t been forgotten. So to make up for it, I’ll start with them.

Castle Ruins

The entrance way got a bit damaged a couple of weeks ago when some of the model work got caught out in the rain, we had torrential rain all of a sudden, and I just couldn’t get everything back inside in time. It had been under coated with black paint – some of this has been damaged and it will need to be undercoated again before I start getting the colouring done.

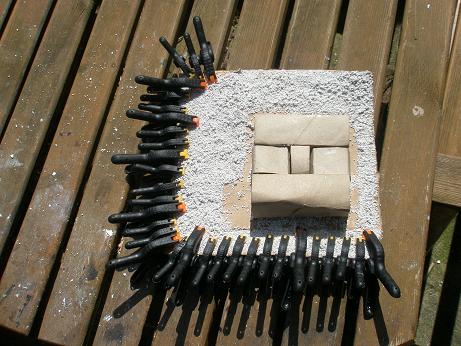
The ruined room piece fared better. 


This has now had the flagstone floor put down, in the same way as I did on the rest of the project, wall filler with stone pattern cut into it before it dries. 

I’ve also worked on the steps leading up to the room.  All I need to do now (I say all, but it’s still quite a bit) are the external walls and the under passage.


Thatched Cottages.

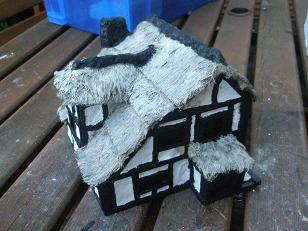
There were two unfinished thatched cottages from older projects that I set out to finish. One is done, and you’ve seen recently. The other where the chimney had to be cutaway and rebuilt has now been under coated, the basic thatch painted – although I experimented with the colouring on this and I’m not too sure I’m happy. I’ll go into that more in my next blog. I’ve also base painted the wood and the chimney. Although the other cottages have wood work which is wood coloured I’m debating with this one whether to go for the black wood finish. Any thoughts?


Town Houses.

In a recent posting I mentioned finding the old White Dwarf magazines, and I included a photo of the town house I had built from their plans.

I started to build some larger wood framed town houses a while ago, based on photos I had taken and again these got shelved. I dug these out and I’ve also been working to complete them.


You can see from this photo one was more advanced than the other.

Both now have their wood frames completed, and have been plastered up. You’ll see from the early photo that I had tiled the roof – this was a mistake, I should not have done this before completing the frame work, the tiles do not lap over the edge properly. 
(There is a reason I had done this, but it is outside the scope of this blog). 

Now I have had to add the chimneys on after, these are pieces of foam board stuck together with a V shape cut out to fit over the roof, then covered in wall plaster. 

The tiles I am having to lift and insert new edge tiles and an additional row at the bottom, a bit tricky but with a sharp knife and some patience I should get there. 

The sides I’m sticking on additional tiles, once the glue is dry and they have set then I will trim the tiles so that there is a straight edge. 

The tiles are all in the same style as taught by the old White Dwarf articles, small squares cut from cereal packets.

Karl – Birth of Mystery

The prologue is available to read by clicking through from the page on the right. Thanks to those that have pre-ordered. 

As soon as the book is back from the printers any copies ordered through the link on this page to the publisher’s website will be signed up and posted as priority. 

I’ll let you know when they have been sent out.


Friday, 29 April 2011

All Packed Away

Project Round Up – Friday 29th April

Despite the initial weather forecast of showers for the Royal Wedding Day,  the weather actually stayed quite nice – we only got a few odd spots of rain this afternoon. I managed to take advantage of the extra holiday to get some work done on the castle ruins in the garden.

The main job I wanted to get completed was to give all the castle ruin pieces that had been finished a coating of purity seal, and on a job this big it’s certainly an outdoor activity.


So here we have all the completed pieces, finally sprayed drying out on the table.

Then I managed to get the last of the wall filler on the castle entrance and some more filler on two more walls of the room. I’ve also decided to glue one of the pieces ripped out of the back wall onto the too flat top of the wall I was working on last week. Once the glue has dried I’ll use the wall filler to cover the join. This will give a better ruin effect than the very straight line that I initially had.

Finally I took the opportunity once the pieces had dried to lay everything out including the entrance tunnel and the extra room before boxing up all of the completed pieces.

 
Here they are in storage, and true to form I try to use as much of my own recycled material for packaging as well. I have some air pockets from some parcel deliveries but the majority of the packaging used for these models comes from shredding. I always shred anything with name, address or other personal details on. This shredding is then sealed up into small plastic bags, often the bags magazine subscriptions get delivered in and then they get inserted between the models.

Making your own packaging packs means they can be as thick or thin as you need them to be to fit around your models.

And of course, it’s the safest way to dispose of that personal data.


Monday, 25 April 2011

Project Round Up – Easter Monday

Well, the Easter holiday is nearly over, at least I have managed to get some model work done each day. Today was quite a busy day model wise, with the sun shining down and ‘Big Finish Doctor Who’ audio book CDs playing in the background I got quite a lot completed.

Castle Ruins – Castle Entrance.

The left hand side of the entrance has now been completed, leaving only a small part of the roof near the murder holes to be completed before I start painting.

Castle Ruins – Partial Room.

This is the last piece of the castle ruins that I had originally planned, and I had the polystyrene skeleton cut out for a while now.


This piece gives me a partial room with a doorway, on a higher level, with a set of steps leading up. The steps have been built from odd pieces of polystyrene, glued in a spiral set of steps, once covered in wall filler these will be much sturdier than they are now.

I have reinforced the top level join with a couple of cocktail sticks inserted into the top step and the main body piece. 

Today I started to cover the first couple of walls then decided that the whole thing was too box shaped still so broke out two lumps from the remaining sides.

I think this will give a better result in the end. These odd pieces will be made up to be small wall fragments for general placement on the overall layout.


Coffee Stick Ghost Town.
After looking at the paintwork from yesterday I decided that the models did not need a second coat of burnt umber before I added the lighter shading, so I started today with a 50–50ish mix of Wilkio’s Burnt Umber and Americana’s Desert Sand.  Both are acrylic based paints. I picked up several different bottles of Americana paint from a recent clearance sale at the local branch of Hobbycraft. (I try to pay regular visits to as many hobby shops that have clearance bins, as you never know what you might find.)

I lightly coated the two models with this lighter brown mix, then once dry I dry brushed with the same acrylic white I bought at the local pound store which I’ve been using on the castle ruins to give that aged weathered look to the wood work.

These two models have come out a lot darker than the original two coffee stick buildings I made; I actually prefer this colour scheme and will probably keep to this when I make a few more of these models. I think the town needs a few extract smaller models to go along with the three large ones that dominate the one smaller model at the moment.

All these models have had their windows painted black; this is quite a neutral design so that I can always add additional effects later.


After, I gave all four of the coffee stick ghost town buildings a quick spray with Games Workshop’s purity seal. The other two have been waiting a while over winter for their spray, as I try to do this outside when the weather is better.


Friday, 22 April 2011

Project Round Up - Good Friday.


Had one of those odds and ends days where I gathered up a number of the projects I’ve been working on over the last few weeks in a bid to try and get some of them finished off.

Castle Ruins – Castle Entrance. I’ve now got the front entrance brickwork and the right hand side brick work finished. I did this today out in the garden with the sun quite strong for this time of year. I found that the wall filler was drying off faster than I could get the side covered. I had to work in smaller sections  to be able to carve the stone effect into it before it dried too much. If it dries too quickly the stone effect becomes a bit crumbly when it is dug into. The best thing in hot weather is to work on smaller sections at a time, but because it does dry quicker you can get more area coverage in the long run.

Castle Ruins – Walls. I got the paint job done earlier in the week, so today these pieces were given a spray with ‘Purity seal’ from ‘Games Workshop’.

Coffee Stick Houses . There are currently two being worked on. One had a few missing pieces added on to it, the smaller one has reached the stage for undercoating. As I was working outside I took the quick fire approach and sprayed with ‘Chaos Black’ also from ‘Games Workshop’.

Log Cabin. This is a test piece using home grown canes.  I’ve added some cane pieces now to two sides, once the glue dries I’ll clean up and see what it looks like. I did find that a couple of the cane pieces had fallen off from the first attempt, but I’m not giving up yet. I think this will work.

Monday, 11 April 2011

Castle Ruins - Ongoing work

Another weekend with only a few hours spent working on the models.

First I’d like to say a big thank you to all those who have promoted my blog on their sites, your support and encouragement is much appreciated as well as any comments left. Speaking of comments...

Luckyjoe asked about murder holes for the entrance way to the castle ruins. I admit I forgot all about those small holes in walls and ceilings where defenders could pelt invaders with rocks or pour down boiling oil. These were a very vital part of a castle’s defensive measures. To really do justice to them is a bit late now, as I’ve already lined the entire entrance with the filler, but there was an area along the top where a square shape on the original polystyrene did cry out for something a bit extra to make a feature out of it.


Using a metal rod I managed to break through the wall filler and make four suitable holes in each corner of the square. These will be turned into some murder holes, but I will be making an additional piece for the entrance later so I’ll make certain I give more thought to the forward design.

Cheers Luckyjoe now who ever GMs using these has an extra weapon to use against the players, guess I should start writing my own adventure. (BigLee beware, you think our current GM is EVIL – sign off with manic laughter...)

I also realised that there were no window pieces either, so in the other curved section I was working on I cut out some small window shapes this time before I added the wall filler.

Up until now I’ve been using plastic coffee sticks to cut the stone shapes into the wet wall filler, but they don’t actually last very long and soon snap.

So I’ve given in and bought a new small chisel blade to use for the stone work – a quick trip to the local hobby shop this weekend.


This wall and the flag stone tile effect I’ve put on to the top of the entrance way were carved out using the new blade, I don’t think you can tell the difference.

I’ve only got as far as undercoating with black acrylic paint this weekend – I’m going to try and get the grey colouring done during the week if I get a chance.