Showing posts with label Thatched Cottages. Show all posts

Sunday, 23 December 2012

Vorsteck versatile buildings


Continuing my short collection of posts about the Vorsteck Rock Town.


I think I mentioned that these buildings cost more to make than my usual projects, due to the nature of the building and thus the materials used. For this reason I wanted to be able to use them in more ways than one once their original purpose was finished. So aside from being the underground houses of Vorsteck I wanted to add adaption packs for them to turn them into various other countryside cottages.


The images that I had in mind came from the Torchwood episode Countryside where a small community of locals had some very unpleasant dietary habits, and the stone cottages of the recent remake of The Wolfman.

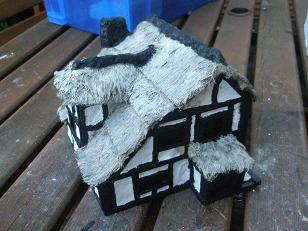
I built the basic house shape from four sides of rectangular foam board. I did not use the usual shape for the small sides with triangle roof as I had envisaged the Vorsteck houses as having flat roofs as there would be no rain to content with underground.

I built the flat Vorsteck roofs as being detachable from the main building, and then started to build additional separate roofs that could rest on top, and built them so that these roofs could be swapped when required for the flat stone of Vorsteck, or thatched or tiled country cottage roofs.

The windows and doorways I cut out so that they were open, the wet DAS putty I used to frame the cut edges of the foam board so that the frames were still stone looking but also more robust than just the tiled stone effect.


Because I was going to curtain the windows and doors with fake algae (see next post) I needed to have a way to fix them inside and still be changeable. I built up the insides with off cuts of foam board and covered them with card making insert areas to mount different effects for windows and doors. For the doors I made additional wooden doors stuck to card which could be slid in to these slots when I wanted the buildings to be cottages on the moors and the windows were shuttered by the addition of inserted clip in wooden panels made to look like closed shutters.

As each building was slightly different in size and shape each building had to be numbered and each set of adaption pieces made separately and also numbered so that they could be easily attached to the right buildings. I haven’t yet completed the adaption pieces for all the buildings as these were not priority but I think over all this is going to work to allow these buildings to have a varied lease of life.


NEXT: Vorsteck the algae curtains


Sunday, 14 August 2011

Project Update

Apologies for the lack of updates last week, got a bit distracted last weekend with one thing and the other, including a washing machine that decided to smoke the clothes rather than clean them. New one being delivered next week, you never know there might be some interesting packaging to go with it.

 Here are the latest updates from the workbench.

Thatched Cottage Pub

The base for the thatched cottage that got too wet was a bit beyond repair, so I peeled the top layer off and glued this to a new base made in the same way to the original. Now I need to repair some bald patches on the base, before adding extra colour and texture to the ground. I have started to build a small wooden fence around the outside of the pub grounds using the coffee sticks, and incorporated an interesting piece of twig I found to make a felled tree trunk.


Castle Ruins

I’ve started to paint up the entrance to the castle ruins; this is basically using white and black paint mixed in varying shades of grey and neat white. I’ve also added more stone work to the remains of the room. I wasn’t going to brick up the entire underside, but some parts seen at the wrong angle will show up the bare polystyrene so I will have to make sure the underside walls are covered at least.


The plastic pieces of a ruined church I got from BigLee a few years back which I tried to fill and paint then left for dead have been resurrected. I’ve stuck the piece as was onto a new larger piece of base card to extend the ground work and used some of my current ready mix wall filler to soften the plastic edges and fill the gaps to take the straight, square edges off. I’ve also glued a piece of the polystyrene covered broken wall from the castle set to the base.


I’ve been re-watching the first series of Vampire Diaries, and the old ruined church set where the vamps were locked away has given me some idea as to what I want to do with this piece now. Plenty of greenery and sticking up boulders and stones, the graveyard part of it I’ll keep for a later project. I’ve a few plans for an old graveyard layout.

Plus I've added the town houses to Gallery Page.

Sunday, 17 July 2011

Rain Stop Blog

The blog I was going to put up tonight has been postponed, not because of a public media enquiry but because of the weather. The work on a base for the cottage pub has been ruined by the rain.

Today we had moments of brilliant scorching sun shine and heavy downpours. At one moment when the sun was at its best I put the base work out to dry, got distracted and was unable to get the base in when a heavy thunderstorm hit. My gut feeling is it is two days work in the bin. I’m going to let it dry out and see if it is salvageable but I don’t hold out much hope. 

Sorry to sound so negative.


On a positive note, one of the country cottages got to feature in our game on Friday, hence the hurriedly posted Gallery Page, to allow our GM to pick the cottage he wanted. If you’re curious to know which one featured I’m sure BigLee will have a game write up soon with photos.


I’ll also very soon be featuring some of the figures I use when setting layouts, these all have very specific characters, either characters I’ve played or characters from Karl – Birth of Mystery. What I would like is help indentifying the origin of some of the figures, some I know, some I’ve acquired, lost original packaging and adopted them. It would be nice to tie back to who made them and who or what they were originally. More of that later. I'll feature them one or two at a time in later postings.

Sunday, 3 July 2011

Country Cottages - Golden Thatch and Leaded Windows

My main aim this weekend was to try and get the last of the thatched cottages that I had on the go finished. When I last worked on it I had painted the thatch but was not happy with it. I had used the same golden shades as I had before but I had deliberately dirtied it up between coats by painting it with the dirty water used for cleaning brushes.  I was also in two minds as to whether to wood paint the timber frame work or go for the black effect. 


Whilst I was out shopping on Saturday I found a whole lot of acrylic paints being sold off cheap in WH Smith, mainly brown shades, obviously not popular with regular artists but great when you’re mainly painting thatch and wood.

Here is my hoard of paints. This is nice paint, Windsor and Newton’s Galeria range, and works really well, really nice to work with.


From this hoard I selected three colours, which basically decided the outcome of my painting dilemmas. Raw Sienna when painted over the existing thatch gave it a wonderful golden effect, combined with everything that had gone on before it blended in to give a result I am really pleased with. Also in the batch of paint was Ivory Black, this made up my mind; the wood work was going to get a coat of this. I also picked their Burnt Umber for the two doors. These were painted over with the base Burnt Umber, then a Burnt Umber and White mix to soften the wood and give an aged effect.


I have now completed most of the paint work on this model, and I’ve come to the assumption it’s more of a country pub now that an a cottage, funny how these things take on a whole new character as you work on them.

I have also experimented with a new feature for the windows. If this works I’m planning on using it for the medieval town houses. I’ve tried to gain a lead pattern on the glass, and now I would really like your honest opinion if you think this works. At the moment the windows are not fitted in, they are just inserted for effect.

What I did was to take a piece of hard plastic, sprayed it with glue and stretched the netting bag supermarkets use to sell some fruit in over it. 


Once fixed I’ve cut the plastic into squares to fit the windows, so that the stretched netting looks like the small fancy leading that was common to these old style buildings.

The photo at the top of this blog is without the new windows, and the photos below are with the windows fitted.


Sunday, 26 June 2011

Project Round Up


I thought I’d give a quick round up of some of the projects I’ve been working on. I realised that it’s been a while since I posted anything about the castle ruins. These have been taking a bit of a back seat recently but haven’t been forgotten. So to make up for it, I’ll start with them.

Castle Ruins

The entrance way got a bit damaged a couple of weeks ago when some of the model work got caught out in the rain, we had torrential rain all of a sudden, and I just couldn’t get everything back inside in time. It had been under coated with black paint – some of this has been damaged and it will need to be undercoated again before I start getting the colouring done.

The ruined room piece fared better. 


This has now had the flagstone floor put down, in the same way as I did on the rest of the project, wall filler with stone pattern cut into it before it dries. 

I’ve also worked on the steps leading up to the room.  All I need to do now (I say all, but it’s still quite a bit) are the external walls and the under passage.


Thatched Cottages.

There were two unfinished thatched cottages from older projects that I set out to finish. One is done, and you’ve seen recently. The other where the chimney had to be cutaway and rebuilt has now been under coated, the basic thatch painted – although I experimented with the colouring on this and I’m not too sure I’m happy. I’ll go into that more in my next blog. I’ve also base painted the wood and the chimney. Although the other cottages have wood work which is wood coloured I’m debating with this one whether to go for the black wood finish. Any thoughts?


Town Houses.

In a recent posting I mentioned finding the old White Dwarf magazines, and I included a photo of the town house I had built from their plans.

I started to build some larger wood framed town houses a while ago, based on photos I had taken and again these got shelved. I dug these out and I’ve also been working to complete them.


You can see from this photo one was more advanced than the other.

Both now have their wood frames completed, and have been plastered up. You’ll see from the early photo that I had tiled the roof – this was a mistake, I should not have done this before completing the frame work, the tiles do not lap over the edge properly. 
(There is a reason I had done this, but it is outside the scope of this blog). 

Now I have had to add the chimneys on after, these are pieces of foam board stuck together with a V shape cut out to fit over the roof, then covered in wall plaster. 

The tiles I am having to lift and insert new edge tiles and an additional row at the bottom, a bit tricky but with a sharp knife and some patience I should get there. 

The sides I’m sticking on additional tiles, once the glue is dry and they have set then I will trim the tiles so that there is a straight edge. 

The tiles are all in the same style as taught by the old White Dwarf articles, small squares cut from cereal packets.

Karl – Birth of Mystery

The prologue is available to read by clicking through from the page on the right. Thanks to those that have pre-ordered. 

As soon as the book is back from the printers any copies ordered through the link on this page to the publisher’s website will be signed up and posted as priority. 

I’ll let you know when they have been sent out.