Ok where was I? (Previously Country Cottages Fireworks and Fur)
Oh yes thatching my cottages and updating my materials used page – but then our dear friends at Bloggerton blew up their system and made a hash of the system restore – yes my page updates have not been restored. Suffice to say, modelling is a hobby, as an IT professional I’m not impressed. Ok moan over, let’s get on with something constructive.
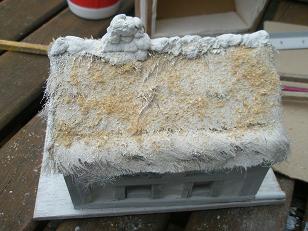
The next stage is to glue on the chimney and the capping stones. The stone and the chimney work are made from modelling clay – I tend to use DAS or similar material for this. I make small stone shapes and glue them to the top of the model sealing the gap between the fur edges.
Then I basically build up the box chimney shape using small pebbles made from the modelling clay, glued on whilst still wet.
On the cottages where the chimney is built up as an external wall the clay stones are made to fit and are build up over the exterior of the foam board.
One of the other models I have found half finished has a chimney wall like this. I’ll be working on that one next week.
You need to leave the clay work overnight to harden off before sanding down the building to get any unwanted marks off the wood, for example any wall filler that has smeared over the wood. Once the building has been cleaned up then the painting can begin.
The first stage is to give the whole building an undercoat, for buildings where I have thatch work I tend to go back to a white undercoat and spray quite liberally with white paint. (In this case I’m using Skull White from Games Workshop)
Once this is dry I spray the thatch again with a second blast of the skull white and this time whilst wet I lightly sprinkle with saw dust.
Once this has started to dry off, I then start to add colour, and here you do need to use quite a heavy amount of paint to ensure that the fur is matted together.
This time I’ve used two creamy brown shades from the Americana Decoart Acrylic paint collection, the shade names being Desert Sand and Butter.
This has given a very light and clean colour to the thatch – I will probably do a little dirtying down on my next session.
When painting this I use a large brush and apply very liberally as I have said, also ensuring that the paint is well worked into the edges and front of the fur to stiffen it up and to make it look as much like the ends of cut thatch as I can, pushing the brush into the exposed fur.
Next I gave the stone topping and chimney a black base coat to start the stone work painting.
Next week I’ll dirty up the thatch a bit, paint the stone work in grey shades and then start the on the wood work.


Nice work sir, keep it coming.
ReplyDeleteLooks good, I enjoy seeing your work!
ReplyDeleteI love your Thatch roofs. They look really good. As always an enjoyable and educational read!
ReplyDeleteI've got a pack of that DAS modelling clay but not used it yet.
btw... Blogger lost the content of two posts I had almost finsihed writing. They restored the posts but not the most recent edits I had made, which was basically most of the text! Not impressed.
I paticularly like the roofline tiles and chimney.
ReplyDeleteCheers guys, much appreciated.
ReplyDeleteThe thing with DAS is it goes rock hard once it has been opened if you don't use it. But you can get it back soft by soaking it in water.
I too like theroofline and chimney very rustic look to it.
ReplyDelete