Sunday 31 July 2011

Project Roundup July

Bit of a random blog today I’m afraid, not had a lot of time this weekend for model work, but I thought I’d take the opportunity to round up where some of the projects are at.


Castle Ruins

Not much advanced this month, although the main piece has now had the last of the exterior walls finished, by that I mean covered in wall filler and marked out. There is a small amount of interior work to be completed and some under side work before I start painting. The tunnel entrance way is still undercoated black with no further development. Once the main piece has caught up I’ll paint them all up together.


I’ve been having a rummage in some old boxes, and discovered two things of interest. One piece which comes under this category of ruins is a plastic model piece of aches and windows, which BigLee passed over to me a number of years ago, having decided it wasn’t quite right for the battle table he was putting together and wondered what I could do with it. I think it looked just too plastic, and was really just a front piece, being that it was not even finished on both sides. I tried filling it and painting it, but couldn’t quite get a result either – it went into the ‘deal with this later’ box.  This is how it looks now, I’m going to see what I can do to bring it to life - watch this space.


Scenic Layout

Whilst rummaging I also pulled out a small hillside that I remember making with dad when I was a kid for the model train set. This went into the far corner of the board to make the layout look like it was in a small valley. It was built on a chicken wire frame, covered in sack cloth and papier-mâché, and then painted. It’s suffered a bit over time; I think it’s time it got freshened up and incorporated into my current fantasy layout.


Miltonburg Town

Speaking of the layout, I took some time this month to lay out the larger houses and village pub which I recently built along with some figures and tables which I had built from coffee sticks some time ago for another campaign. This campaign saw me furnish an entire inn interior from bar, stairs, tables, fireplace and bedrooms. Most of the small pieces have survived to be used again. 


Whilst I’m on the subject of my fictional town Miltonburg, a small amount of work has been added to Zandina’s townhouse. 


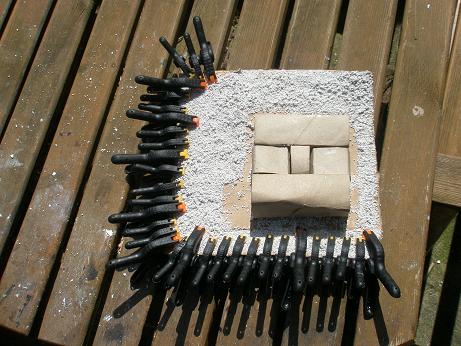
The baseboard for the pub that got a good soaking thanks to the stormy weather we had a few weeks ago is currently under attempted repair. 


Originally I had cut two sides of the Sol box (see previous posting) and stuck them together twisted at 90 degrees to each other so that the grain of the corrugated cardboard went across each piece, this I had hoped would give the base more stability when gluing on it, to prevent it curling up – but I think the amount of rain has banished any hope of a perfectly flat base.  I’ve re-glued the base and it’s currently being held together. We’ll see.

Sunday 24 July 2011

Town Houses Paint Work

I can’t believe it, the last time I featured the town houses they were very much in their naked just built stage. I’ve not shown them for a while and they are practically finished, that kind of crept up on me. I think it was because I was doing the paint work at odd times during the evenings.


Ok, the paint job. First step was a spray with GW’s Skull White. Then I gave the main areas a base coat, black acrylic on the wood work, and the Americana Decoart Acrylic Butter, on the walls. 


The roof tiles were given a coating of black acrylic then a coating of orange & black mix to give it the terracotta look. Once this was done I then set about painting the top layer. White on the walls, but I allowed the butter to show through around the edges to give an aged effect. 

The wood work was given a coat of the Galeria Ivory Black. Then I stippled the orange over the tiles to brighten then up. I used a mix of white and black to make a light grey for the chimneys. 


I used pieces of the plastic covered with black fruit netting for the windows. I need to touch a couple of these up where the netting hasn’t gone down correctly. I’ll do this over the next few days.

The doors were painted with Galeria Ivory Black, Burnt Umber and Raw Sienna.

I’ve set up a few Miltonburg scenes with some characters; looking at these old figures I think they are in need of a bit of refreshing themselves.
The first three figures


Karl, his grandmother Zandina and his father Max.

The Karl figure was originally a second Adric figure I bought from the FASA  Dr Who game. It underwent some modification with a large sword being added to his back, which can't be seen in this picture. 

Zandina was the Romana figure from the same set.

Max - I don’t remember where this figure originally came from, any suggestions would be appreciated.

Saturday 23 July 2011

Karl - Birth of Mystery Update


Just a quick posting to let you know, Karl - Birth of Mystery has been delayed until mid August as there is currently a backlog going through to the printers at the moment. Just spoken with my publisher and I should have the copies ready in the few weeks. I'll post on here once they start shipping.

Sorry for the delay,
Cheers
Derek

Sunday 17 July 2011

Rain Stop Blog

The blog I was going to put up tonight has been postponed, not because of a public media enquiry but because of the weather. The work on a base for the cottage pub has been ruined by the rain.

Today we had moments of brilliant scorching sun shine and heavy downpours. At one moment when the sun was at its best I put the base work out to dry, got distracted and was unable to get the base in when a heavy thunderstorm hit. My gut feeling is it is two days work in the bin. I’m going to let it dry out and see if it is salvageable but I don’t hold out much hope. 

Sorry to sound so negative.


On a positive note, one of the country cottages got to feature in our game on Friday, hence the hurriedly posted Gallery Page, to allow our GM to pick the cottage he wanted. If you’re curious to know which one featured I’m sure BigLee will have a game write up soon with photos.


I’ll also very soon be featuring some of the figures I use when setting layouts, these all have very specific characters, either characters I’ve played or characters from Karl – Birth of Mystery. What I would like is help indentifying the origin of some of the figures, some I know, some I’ve acquired, lost original packaging and adopted them. It would be nice to tie back to who made them and who or what they were originally. More of that later. I'll feature them one or two at a time in later postings.

Sunday 10 July 2011

Country Cottages - Those Leaded Windows

Not a great deal of time this weekend for modelling, but the one thing I wanted to address were those lead windows. Something bugged me, and I think it was the colour. When I first had this idea it was back in January when I was suffering a chest infection, and was making hot lemon and honey drinks, I had two bags of lemons, one was black and the other yellow. It was the black bag that had sowed the seed of the idea.

With this in mind I hunted the fruit and veg section of the supermarket until I found a bag of limes in a black bag. I added the limes to the shopping basket and then needed something to do with them so added a case of Sol to the shopping as well. Ok, my beer fridge needed restocking as well so all was not lost, it wasn’t quite the over indulgence just for netting.


So this time I took a bit more care about preparing the material, with the second piece of the plastic sheet I clipped the netting to the sheet first, then lightly sprayed with the glue.  

Last time I used too much and the sheet was sticking to everything especially when I was trying to lay the netting out on it. 

This time, with the netting prefixed on the sheet it pulled over much easier and neater.


Left over night to dry I then cut the small squares out and slotted them in place, I think the black works much better, although the size of the netting is slightly larger than the first red netting. 

Now if I could get the black netting in the red size...

I’ve put the new style windows in on all sides now.


Ok, vote time – which do you guys think works best the red or the black?


Tuesday 5 July 2011

Country Cottage - Photo Sequence


A short sequence of photos showing the development of the Country Cottage from framework to almost complete state as featured in recent blog postings.


Sunday 3 July 2011

Country Cottages - Golden Thatch and Leaded Windows

My main aim this weekend was to try and get the last of the thatched cottages that I had on the go finished. When I last worked on it I had painted the thatch but was not happy with it. I had used the same golden shades as I had before but I had deliberately dirtied it up between coats by painting it with the dirty water used for cleaning brushes.  I was also in two minds as to whether to wood paint the timber frame work or go for the black effect. 


Whilst I was out shopping on Saturday I found a whole lot of acrylic paints being sold off cheap in WH Smith, mainly brown shades, obviously not popular with regular artists but great when you’re mainly painting thatch and wood.

Here is my hoard of paints. This is nice paint, Windsor and Newton’s Galeria range, and works really well, really nice to work with.


From this hoard I selected three colours, which basically decided the outcome of my painting dilemmas. Raw Sienna when painted over the existing thatch gave it a wonderful golden effect, combined with everything that had gone on before it blended in to give a result I am really pleased with. Also in the batch of paint was Ivory Black, this made up my mind; the wood work was going to get a coat of this. I also picked their Burnt Umber for the two doors. These were painted over with the base Burnt Umber, then a Burnt Umber and White mix to soften the wood and give an aged effect.


I have now completed most of the paint work on this model, and I’ve come to the assumption it’s more of a country pub now that an a cottage, funny how these things take on a whole new character as you work on them.

I have also experimented with a new feature for the windows. If this works I’m planning on using it for the medieval town houses. I’ve tried to gain a lead pattern on the glass, and now I would really like your honest opinion if you think this works. At the moment the windows are not fitted in, they are just inserted for effect.

What I did was to take a piece of hard plastic, sprayed it with glue and stretched the netting bag supermarkets use to sell some fruit in over it. 


Once fixed I’ve cut the plastic into squares to fit the windows, so that the stretched netting looks like the small fancy leading that was common to these old style buildings.

The photo at the top of this blog is without the new windows, and the photos below are with the windows fitted.