Wednesday 29 June 2011

Town Houses

Lincoln as Inspiration


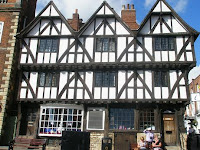
Here are a few photos taken last year in Lincoln. These show some of the old style timber frame buildings which I’m aiming to achieve in look for my medieval houses. 


This is going to be the style of most of the buildings that I’ve used in the book Karl – Birth of Mystery.

In my previous posting I showed a couple of buildings which I’ve been working on, these are a couple of general buildings.

I’m also going to add a few more buildings based on the book from the main town that features in the book, these are a tavern (“The Ship & Hankor”), a row of narrow shops (which will include “Axilion Trade”), and a larger than average house where Karl’s grandmother (Zandina) lives when in town and practicing her medicinal skills.


I’ve started to build Zandina’s house, already. I have the basic foam board shell, and I’ve added two toilet rolls on the front to form bay fronts. I’ve been trying to work out what I could do with the inside tubes from toilet rows for some time.

In these two tubes I put two folds in to flatten one side in each in order to stick them to the building, then folded down the tops to form pointed attic rooms. 

Sunday 26 June 2011

Project Round Up


I thought I’d give a quick round up of some of the projects I’ve been working on. I realised that it’s been a while since I posted anything about the castle ruins. These have been taking a bit of a back seat recently but haven’t been forgotten. So to make up for it, I’ll start with them.

Castle Ruins

The entrance way got a bit damaged a couple of weeks ago when some of the model work got caught out in the rain, we had torrential rain all of a sudden, and I just couldn’t get everything back inside in time. It had been under coated with black paint – some of this has been damaged and it will need to be undercoated again before I start getting the colouring done.

The ruined room piece fared better. 


This has now had the flagstone floor put down, in the same way as I did on the rest of the project, wall filler with stone pattern cut into it before it dries. 

I’ve also worked on the steps leading up to the room.  All I need to do now (I say all, but it’s still quite a bit) are the external walls and the under passage.


Thatched Cottages.

There were two unfinished thatched cottages from older projects that I set out to finish. One is done, and you’ve seen recently. The other where the chimney had to be cutaway and rebuilt has now been under coated, the basic thatch painted – although I experimented with the colouring on this and I’m not too sure I’m happy. I’ll go into that more in my next blog. I’ve also base painted the wood and the chimney. Although the other cottages have wood work which is wood coloured I’m debating with this one whether to go for the black wood finish. Any thoughts?


Town Houses.

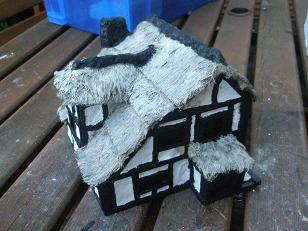
In a recent posting I mentioned finding the old White Dwarf magazines, and I included a photo of the town house I had built from their plans.

I started to build some larger wood framed town houses a while ago, based on photos I had taken and again these got shelved. I dug these out and I’ve also been working to complete them.


You can see from this photo one was more advanced than the other.

Both now have their wood frames completed, and have been plastered up. You’ll see from the early photo that I had tiled the roof – this was a mistake, I should not have done this before completing the frame work, the tiles do not lap over the edge properly. 
(There is a reason I had done this, but it is outside the scope of this blog). 

Now I have had to add the chimneys on after, these are pieces of foam board stuck together with a V shape cut out to fit over the roof, then covered in wall plaster. 

The tiles I am having to lift and insert new edge tiles and an additional row at the bottom, a bit tricky but with a sharp knife and some patience I should get there. 

The sides I’m sticking on additional tiles, once the glue is dry and they have set then I will trim the tiles so that there is a straight edge. 

The tiles are all in the same style as taught by the old White Dwarf articles, small squares cut from cereal packets.

Karl – Birth of Mystery

The prologue is available to read by clicking through from the page on the right. Thanks to those that have pre-ordered. 

As soon as the book is back from the printers any copies ordered through the link on this page to the publisher’s website will be signed up and posted as priority. 

I’ll let you know when they have been sent out.


Wednesday 22 June 2011

Karl - Birth of Mystery

Shameless Self Promotion Alert

Karl – Birth of Mystery
By D. J. Kettlety


Yes, I’ve finally gone and done it. I’ve written the first part of Karl’s story and got it published.

So a little background to the creation of the character. Karl Axilion was the first character I played in a fantasy RPG. He needed a back story as he joined into an existing campaign. Then many years later when a new campaign started a new GM who was a player in that old game suggested I dust off Karl, revamp the story and use him in the new setting. So I did, I took the character, re-worked the story a bit and introduced him into that campaign, into a whole new specially created world.

This story is again a piece of the original, a piece of the new and a whole lot more besides. It is not a blow by blow account of the game. This is the first part of a trilogy, and is a completely removed from the games, just borrowing favourite characters and using them for my own devices. Book two is almost complete and the third is well plotted out to conclusion.

Welcome to the town of Miltonburg, where Karl and his family live, (for now). During the adventure you’ll find yourself in a bar down by the dockside called ‘The Ship and Hankor’, and one day on here I’ll explain why it has that unusual spelling, as I start to build a model of the place.


Karl – Birth of Mystery
By D. J. Kettlety

Published June 2011 
by “100 Publishing” an imprint of Hirst Books.
Cover design by Robert Hammond

ISBN 9-781-90795929-5

Karl should never have been born.

His grandmother, Zandina, knew that; even though she had tried to hide it from Karl's mother, her own daughter.

Karl's birth now secured her future. Her status as a Guardian of the Knowledge was in jeopardy; but what could she do?

Many signs had been seen by the Guardians of Knowledge, but none had seen enough of them to be aware that the portent they foretold was going to come to pass in this lifetime.

Karl's birth; on the night that celebrated evil was the last sign, the last warning to those that were supposed to be vigilant.

For some, the purpose of their existence was now over.

For Karl, death threats, magic, divine intervention, betrayal, abductions and murder - his adventure was just beginning...


If this has your interest and you’d like to pre-order then please follow this link, all orders placed through the Hundred Publishing Website will be signed and dedicated.

Monday 20 June 2011

Old White Dwarf Magazines Found

I cheered with delight* as I dragged an old box out of the shed to discover some of my old White Dwarf magazines from 1990 / 1991 published by Games Workshop. 

These were some of the issues that got me into this model making lark in the first place. It was the articles that these magazines contained that taught me how to model, something until then I had only ever marvelled at. 


I’ve not yet found all the missing magazines from that era, but I thought I’d give some credit to the articles that first got me started. I would love to see a special book printed containing all these articles collected together because they were so well written and presented.

I’m still missing the issue with the coaching inn. I know it must be around somewhere. I am going to keep looking. The article collection I was particularly interested in was “The Modelling Workshop” by Dave Andrews and Phil Lewis (unless otherwise stated)


Issue 132 December 1990 – Hills and Mines.
Issue 133 January 1991 - Fences, Walls and Hedges.

Issue 135 March 1991 – Ruined Temple. 

I started this project but never got round to finishing it. I also discovered my half build ruined temple, and here are the pieces of that project. 

Something else I will now get finished.


Issue 137 May 1991 – Fantasy Town House.

This one I did build from and here is the actual town house I made. I’ve recently started to build more of these style buildings based on photos I’ve taken on my travels. 

Let’s see what happens with the new buildings.


Issue 140 August 1991 Modelling Workshop 
by Phil Lewis  – Fantasy Barn


Issue 152 August 1992 Modelling Workshop 
by Adrian Wild  - Hills and Woods 


(*) Ok So I cheered to myself and didn’t scare the neighbours any more so than usual.


White Dwarf is copyright Games Workshop, and no copyright infringement is intended, these images are simply to show credit where credit’s due.

Saturday 18 June 2011

Archive Collection – Stone Circle

I know I’ve shown the stone circle a couple of times but I realised that I had never actually talked about it. So, just to put the record straight or curved as the case may be here goes...

The stone circle came about around the same time as I was making the water mill when I had a lot of wall filler mixed up which I couldn’t keep. 


The question was what to do with it; I didn’t have any other models on the go at the time which were ready for wall filler to be added. Rather than waste it, I looked around for ideas as to what to do with it. I had been watching a lot of ‘Robin Of Sherwood’, and some of the scenes featured a stone circle, and with ‘Magical Ring’ and from ‘Clannad’ being one of the albums I often model to it was quite inevitable what came to mind. Oh and not to forget the ‘Doctor Who’ adventure ‘The Stones of Blood’, which must have been in the mental mix somewhere.

The base was a sheet of corrugated card board, and the stones themselves were small off cuts of foam board stuck together, some of the stones were single pieces of foam board, others would have had extra pieces stuck to them to add extra thickness in parts. These were quickly stuck down in a circle, with top pieces placed to make cap stones. I would probably have used quicker drying super glue as I had a pot of filler to use up before it set. Then I liberally plastered the mix over the arranged foam board pieces, ensuring that the surfaces had some curious textures.


Once all this had dried the base was covered with PVA glue and sprinkled with saw dust to add a first level of ground texture.

The whole lot was then painted, in those days all I was just using the Games Workshop paints, so these would have been the colours used.

Various green shades for the base, along with black, white and some of their grey mixes for the stones. Those early paints although having wonderful names were never labelled on the pots in those days, so my memory fades and some have been renamed since I believe.

Additional green flock was then added with more PVA glue, along with some scenic foliage.  I used the oasis foam for flower arranging on the front garden part of the watermill to allow model trees to be poked in at will. Small slithers of the oasis were shaved from the blocks of the foam and glued and pressed down in patches on the base of the stone circle. You can clearly see them around some of the stones where the ground work is a sort of brown-green colour and a different texture.


Sunday 12 June 2011

Country Cottages Paint Work part two

First of all, I would like to start by thanking all the Referring Sites that have recently been pushing traffic my way, in the first 12 days of June I have managed to attain my highest monthly figure yet, and so early in the month. Special thanks goes to the following, your support is much appreciated:-
http://www.theangrylurker.blogspot.com/
http://www.figoblogotheque.blogspot.com/
http://www.kingsleypark64.blogspot.com/        
http://www.wargamesblogs.blogspot.com/

Previously I undercoated the cottage and painted the thatch, details of that can be found here.
The Wood Work  and The Thatch Work.


Since then I’ve had a week off work, holiday time in which I planned to get a lot done, but some sort of allergic reaction caused my hands to swell up for a few days, and you can’t brandish a knife or a paint brush like that. Anyway, between bouts of swellings I’ve managed to complete the paint work on one of the cottages.

The walls were first painted with the Americana Decoart Acrylic Butter, then over painted with white acrylic blending into the sides and corners so that the walls also had an aged look.


I also dry brushed with white on the wood work, before picking out the joints of the wood frame and beams with a watered down black acrylic, this added additional dirt worked into the cracks.


The chimney and stone work were painted black, followed by a grey mix painted over the undercoat, and then topped off with white detail.

The windows were painted black; I tend to keep these dark and neutral. They can always be dressed for special occasions with inserts if you need a lighted window look later.


The sawdust base was painted green but then additional red sand and green flocking was added with PVA glue over the top, some of the red sand was rubbed into the wood work of the step, again to give it that lived in and used look.

I added the small pieces of bush and a couple of pieces of cork to acts as rocks which I painted up with the same colour scheme as the chimney.


The final paint work was addressed to distress the thatch, here I used a mix of orange, butter, and burnt umber in varying proportions to give extra depth and age to the thatch.

The only main concern was not to over use the orange as this was too bold, where the orange came through too strongly I blended back with additional ‘butter’ to soften the effect.


All it needs now is a spray of purity seal and the job’s done.

Now to get back to work on the cottage where the chimney stack had to be cut away and rebuilt...

Monday 6 June 2011

Country Cottages Fixing the Chimney

Today’s work was interrupted by showers, forcing me to dash in and out between bursts, but then the weather took a final turn and all hope of working outside was lost.


 One of the models that I discovered unfinished had a full external stone chimney built by using the DAS clay shaped into stone work and stuck around an additional layer of foam board. I started work putting the wooden beams around it then came to the conclusion that the chimney was too flat, the effect I had been after was for the chimney to be built out of the wall. Once the beams were on and the area between the beams plastered up the chimney would sink flat against it.


I had to take corrective measures, and the first rule of this is a very sharp knife. I cut around the chimney removing it completely from the model. Then stuck another piece of foam board inside the model, like a new backing plate and built out the gap between with more pieces. After that I reattached the chimney to the elevated section giving the chimney more thickness. 

This left a gap around the edge which I filled with more DAS stones to add to the chimney work. I think I might have got away with it.


Thursday 2 June 2011

Audio to Model By

What do you listen to when painting figures or building models? I tend to switch between either a new-age style music genre or audio books.

As I tend to build models around medieval town, ghost town or ancient ruins, I find this the right mood music for this work comes from artists like Clannad or Enya and film sound tracks like Lord of the Rings. The Clannad collection grew out of the soundtrack to the TV series Robin of Sherwood.


With that playing I’m easily transported back to the period of the tv series.

The stone circle was built to the Clannad albums Legend and Magical Ring.


Otherwise it’s the Doctor Who audio collection, and how that catalogue has grown. You can get soundtrack recordings from missing classic tv stories, radio episodes, and audio book readings of unabridged novelizations from the classic series and new readings associated with the new series all from BBC Audio, or Audio GO as they have now rebranded themselves.

As well as the BBC releases there is a huge catalogue of audio drama for Doctor Who from the company Big Finish. These star original TV Doctors Peter Davison, Colin Baker, Sylvester McCoy and Paul McGann and soon Tom Baker will be joining their collection. They feature new and old companions and enemies, and really bring to life the classic series.

The good news for Doctor Who fans who might have missed some of the earlier titles in the Big Finish range is that they have just started their June sale – where bargains galore can be found. If you like sci-fi radio drama and not given one a try before now would be a good opportunity to give them a try. It’s not just Doctor Who they release, go on take a look you know you want to. 


There's over 150 Dr Who titles as well as spin offs to choose from. I've picked 6 here from the earliest releases.

01 The Sirens of Time by Nicholas Briggs, staring Peter Davison, Colin Baker & Sylvester McCoy

20 Loups-Garoux by Marc Platt staring Peter Davison

22 Bloodtide by Jonathan Morris staring Colin Baker

29 The Chimes of Midnight by Robert Shearman staring Paul McGann

34 Spare Parts by Marc Platt staring Peter Davison

36 The Rapture by Joseph Lidster staring Sylvester McCoy


Ok, I’ll come clean at this point, before I start recommending a few more of the titles, John Dorney, actor and writer, who has performed in several and also written for their Doctor Who and Sapphire and Steel series is also a member of the D&D group of which both BigLee , and myself are members. So I am slightly biased on some.
Here's my pick of 4 titles for JD.

Dr Who the Lost Stories - The First Doctor Box Set where he plays Alexander the Great

Three titles written by John Dorney
Companion Chronicles - Echoes of Grey performed by Wendy Padbury

Companion Chronicles - Solitaire  performed by India Fisher

Sapphire & Steel - Remember Me staring David Warner and Susannah Harker.


And, if anyone can recommend any other artists who they listen to whilst being creative, please leave a comment at the end.

I usually Twitter what I'm listening to when working on models, if you want to know what they are then follow me on Twitter (@djkettlety).