Friday, 29 April 2011

All Packed Away

Project Round Up – Friday 29th April

Despite the initial weather forecast of showers for the Royal Wedding Day,  the weather actually stayed quite nice – we only got a few odd spots of rain this afternoon. I managed to take advantage of the extra holiday to get some work done on the castle ruins in the garden.

The main job I wanted to get completed was to give all the castle ruin pieces that had been finished a coating of purity seal, and on a job this big it’s certainly an outdoor activity.


So here we have all the completed pieces, finally sprayed drying out on the table.

Then I managed to get the last of the wall filler on the castle entrance and some more filler on two more walls of the room. I’ve also decided to glue one of the pieces ripped out of the back wall onto the too flat top of the wall I was working on last week. Once the glue has dried I’ll use the wall filler to cover the join. This will give a better ruin effect than the very straight line that I initially had.

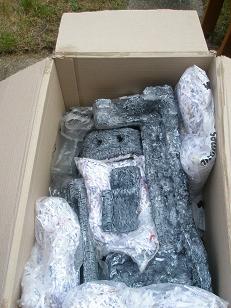
Finally I took the opportunity once the pieces had dried to lay everything out including the entrance tunnel and the extra room before boxing up all of the completed pieces.

 
Here they are in storage, and true to form I try to use as much of my own recycled material for packaging as well. I have some air pockets from some parcel deliveries but the majority of the packaging used for these models comes from shredding. I always shred anything with name, address or other personal details on. This shredding is then sealed up into small plastic bags, often the bags magazine subscriptions get delivered in and then they get inserted between the models.

Making your own packaging packs means they can be as thick or thin as you need them to be to fit around your models.

And of course, it’s the safest way to dispose of that personal data.


Promo Spot - Dave Stokes at Demoncon

Dave Stokes' Webcomic Blackfriars seems to have been attracting some attention within the comic community and he has been invited to have a table at Demoncon in Maidstone this Sunday.

Dave is one of the regular players at the game table where my models are used. (He's usually the one firing thunderbolts at the walls when he misses the beasties, reminds me - must paint on some thunderball damage)

To quote Dave, "I've got my first table at a comic convention on May 1st At DemonCon in Maidstone, where I'll be sketching, flogging prints and trying to promote the webcomic.

"They'll also be running some tabletop and card gaming tables so I thought I'd pass the word on in case anyone's interested and has a free Sunday.
"It's £2 admission and runs from 10am-6pm thought I'll only be there till about 4. The venue's called EDEN, on Bank Street."

Full details can be found on Dave's blog at Dave Stokes Sketch Blog.


Monday, 25 April 2011

Project Round Up – Easter Monday

Well, the Easter holiday is nearly over, at least I have managed to get some model work done each day. Today was quite a busy day model wise, with the sun shining down and ‘Big Finish Doctor Who’ audio book CDs playing in the background I got quite a lot completed.

Castle Ruins – Castle Entrance.

The left hand side of the entrance has now been completed, leaving only a small part of the roof near the murder holes to be completed before I start painting.

Castle Ruins – Partial Room.

This is the last piece of the castle ruins that I had originally planned, and I had the polystyrene skeleton cut out for a while now.


This piece gives me a partial room with a doorway, on a higher level, with a set of steps leading up. The steps have been built from odd pieces of polystyrene, glued in a spiral set of steps, once covered in wall filler these will be much sturdier than they are now.

I have reinforced the top level join with a couple of cocktail sticks inserted into the top step and the main body piece. 

Today I started to cover the first couple of walls then decided that the whole thing was too box shaped still so broke out two lumps from the remaining sides.

I think this will give a better result in the end. These odd pieces will be made up to be small wall fragments for general placement on the overall layout.


Coffee Stick Ghost Town.
After looking at the paintwork from yesterday I decided that the models did not need a second coat of burnt umber before I added the lighter shading, so I started today with a 50–50ish mix of Wilkio’s Burnt Umber and Americana’s Desert Sand.  Both are acrylic based paints. I picked up several different bottles of Americana paint from a recent clearance sale at the local branch of Hobbycraft. (I try to pay regular visits to as many hobby shops that have clearance bins, as you never know what you might find.)

I lightly coated the two models with this lighter brown mix, then once dry I dry brushed with the same acrylic white I bought at the local pound store which I’ve been using on the castle ruins to give that aged weathered look to the wood work.

These two models have come out a lot darker than the original two coffee stick buildings I made; I actually prefer this colour scheme and will probably keep to this when I make a few more of these models. I think the town needs a few extract smaller models to go along with the three large ones that dominate the one smaller model at the moment.

All these models have had their windows painted black; this is quite a neutral design so that I can always add additional effects later.


After, I gave all four of the coffee stick ghost town buildings a quick spray with Games Workshop’s purity seal. The other two have been waiting a while over winter for their spray, as I try to do this outside when the weather is better.


Sunday, 24 April 2011

Project Round Up - Easter Sunday

Today I was off playing the Easter Bunny and delivering chocolaty goodness, and other treats. So the only thing I got done today was the first brown coat of paint on the coffee stick houses. I’m determined to get these done.


I used an acrylic paint from Wilkinson’s. This is the first time I’ve used any of their paint on a large scale. This is ‘Burnt Umber’ which is a very dark brown, and dries even darker. The important thing to remember when painting such a large area like this is to make sure after you've worked the paint into the gaps that the final brush strokes go in the same direction as the wood.


I suspect I will need to give the models a second coat before I start mixing the paint with white and adding the dry brushing effects. I’ll leave the paint to dry overnight and take a judgement call in the morning.


Saturday, 23 April 2011

Project Round Up - Saturday

Not much model work today – priority was the new series of Doctor Who, and getting past a technical problem with receiving the broadcast. If you’ve not seen it yet, then I won’t give away any ‘Spoilers’.


Today I finished off the wood work on the larger coffee stick house that was in production and gave it a quick rub down with sand paper before applying the undercoat using Games Workshops’ Chaos Black spray. That was out in the garden, and then came the thunder and then the rain – so game over.

Friday, 22 April 2011

Project Round Up - Good Friday.


Had one of those odds and ends days where I gathered up a number of the projects I’ve been working on over the last few weeks in a bid to try and get some of them finished off.

Castle Ruins – Castle Entrance. I’ve now got the front entrance brickwork and the right hand side brick work finished. I did this today out in the garden with the sun quite strong for this time of year. I found that the wall filler was drying off faster than I could get the side covered. I had to work in smaller sections  to be able to carve the stone effect into it before it dried too much. If it dries too quickly the stone effect becomes a bit crumbly when it is dug into. The best thing in hot weather is to work on smaller sections at a time, but because it does dry quicker you can get more area coverage in the long run.

Castle Ruins – Walls. I got the paint job done earlier in the week, so today these pieces were given a spray with ‘Purity seal’ from ‘Games Workshop’.

Coffee Stick Houses . There are currently two being worked on. One had a few missing pieces added on to it, the smaller one has reached the stage for undercoating. As I was working outside I took the quick fire approach and sprayed with ‘Chaos Black’ also from ‘Games Workshop’.

Log Cabin. This is a test piece using home grown canes.  I’ve added some cane pieces now to two sides, once the glue dries I’ll clean up and see what it looks like. I did find that a couple of the cane pieces had fallen off from the first attempt, but I’m not giving up yet. I think this will work.

Wednesday, 20 April 2011

Elizabeth Sladen Tribute

In memory of Elizabeth Sladen


Doctor Who fans world wide are again in shock and grief as another legend from the series has passed away. Elizabeth Sladen first appeared as Sarah-Jane Smith the plucky journalist that stowed away on the TARDIS in 1973 opposite Jon Pertwee.

Sarah-Jane then stayed with The Doctor when he became Tom Baker and remained until 1976.  Elizabeth later reprised her role in the spin off K9 & Company, The Five Doctors and when the series returned she was once again invited back to bring Sarah-Jane to a new generation, being rewarded with her own award winning spin off series The Sarah-Jane Adventures.

I met Elizabeth at several signings and conventions and always found her to be warm and friendly, just like the character she portrayed in Doctor Who.

I’m not sure if it wasn’t for the partnership of Tom Baker and Elizabeth Sladen I might not have got so hooked on Doctor Who.


Our thoughts go out to her family and close friends at this sad time.

Sunday, 17 April 2011

Home Grown Log Cabins

Stick with me on this one – the model work had to take a back seat this weekend as the garden really had to have some attention paid to it. From these before and after shots you’ll see why.


However, notice the dead wood in the before picture – I have some Golden Rod and Michealmass Dasiy growing in the garden, when they die back they leave long, thin, straight canes.

I’ve cleared up last year’s dead wood and whilst doing so had an idea. Log cabin models.

I’ve left the best of the sticks to dry out properly but I’ve made a mock up to see if they might work. Looking at the model below I think it might actually work. Not sure about painting them up yet but I'll use this test model to see what happens.

So now I’m not only recycling old rubbish to make terrain I’ve started to grown my own as well.

I’ll report back with results later.


Saturday, 16 April 2011

A tribute to two very special people.


Doreen Kettlety 6th June 1928 – 16th April 2008
Joseph Kettlety 3rd October 1924 – 26th November 2009


I have been painting figures and building models now for many years, and I’ve certainly inherited this creativity from my parents, I think it must be in the blood.

Today is a sad day, it is the third anniversary of the day mum lost her battle with cancer, and having been married for sixty years that took its toll on dad, and he passed away eighteen months later from a heart attack. So today I would like to pay tribute to both of them, and share some of their creations which live on, along with loving memories.


When I was a kid, the school had its annual fate, and mum along with my then neighbour would always be found running the handicraft stall, having more or less completely populated that stall themselves with knitted gloves, scarves and hats, cuddly toys, tea cosies, dolls clothes, puppets – you name it they made it.

You may have guessed by now that I’m a fan of a certain TV programme, Doctor Who. Mum knitted both the multicoloured scarf and the burgundy variation made famous by the 4th Doctor, Tom Baker. In fact – and I’ll post when I find the picture – mum made the entire original costume for me and it has served me well for many fancy dress parties.


When it came time to update the costume mum’s knitting skills were put to the test by knitting the 7th Doctor’s question mark pullover worn by Sylvester McCoy.

We examined photos of the costume closely to get the pattern right stitch by painful stitch.  I’m sure you’ll agree from these photos mum did a very good job of the whole costume.


I said the craft comes in the blood, and dad’s gift was working with wood, which my brother has inherited. He always said wood work was his best subject at school.

Here you’ll see samples of the display cases dad built for me, from wall mounted cases for the lead figures seen here with some of my Doctor Who figures, to large free standing model cabinets, with plate glass shelves for my many fantasy collections.

Dad also turned his hand to display cabinet draws, when I needed something that extra bit special for a special collection.


When I was very young, dad built a mini store for me, and then for a later Christmas my first Hornby Train Set, complete with a village layout – now guess where my love of building scenic layouts and models came from.

Although today does have sad memories, whenever I think of my folks I’m left very warm memories, and I thought today would be appropriate to share some of them.

Thank you.

Monday, 11 April 2011

Castle Ruins - Ongoing work

Another weekend with only a few hours spent working on the models.

First I’d like to say a big thank you to all those who have promoted my blog on their sites, your support and encouragement is much appreciated as well as any comments left. Speaking of comments...

Luckyjoe asked about murder holes for the entrance way to the castle ruins. I admit I forgot all about those small holes in walls and ceilings where defenders could pelt invaders with rocks or pour down boiling oil. These were a very vital part of a castle’s defensive measures. To really do justice to them is a bit late now, as I’ve already lined the entire entrance with the filler, but there was an area along the top where a square shape on the original polystyrene did cry out for something a bit extra to make a feature out of it.


Using a metal rod I managed to break through the wall filler and make four suitable holes in each corner of the square. These will be turned into some murder holes, but I will be making an additional piece for the entrance later so I’ll make certain I give more thought to the forward design.

Cheers Luckyjoe now who ever GMs using these has an extra weapon to use against the players, guess I should start writing my own adventure. (BigLee beware, you think our current GM is EVIL – sign off with manic laughter...)

I also realised that there were no window pieces either, so in the other curved section I was working on I cut out some small window shapes this time before I added the wall filler.

Up until now I’ve been using plastic coffee sticks to cut the stone shapes into the wet wall filler, but they don’t actually last very long and soon snap.

So I’ve given in and bought a new small chisel blade to use for the stone work – a quick trip to the local hobby shop this weekend.


This wall and the flag stone tile effect I’ve put on to the top of the entrance way were carved out using the new blade, I don’t think you can tell the difference.

I’ve only got as far as undercoating with black acrylic paint this weekend – I’m going to try and get the grey colouring done during the week if I get a chance.


Sunday, 3 April 2011

Castle Ruins - Tunnel Entrance and Layout

Time has been against me again this week when it came to model work, but with a sunny Sunday afternoon here I managed to get a couple of hours in the garden to work on the castle ruin entrance tunnel.

You might recall when I first got hold of the large pieces of polystyrene I said to look at them from every direction before cutting them up.  During my examination I noticed a section that would make a great tunnel or passage way.


Using the  hot wire cutter I removed this section. This gives me two sides, with pillars, and a roof. You might notice that the original packing had taken some damage – this happened when I was trying to get the polystyrene home last November during a blizzard, gripping hard onto the large pieces trying to escape in the driving snow my grip broke some chunks off. Anyway it will all add to the final effect.


I’ve now managed to cover the inside of the tunnel (sides and roof) with filler and I’ve carved the stone work in. Over the next couple of weeks I hope to get the outside finished and then painted.

Working outside today I got the first chance in a while to lay out all the finished pieces made for the castle ruin set so far. Here are a few pictures of just one configuration of the pieces.