Showing posts with label Mystery Model. Show all posts

Friday, 11 July 2014

Mystery Model - Completing the Basic Structure

And so we come to the part where I put the last pieces of this 3D jigsaw puzzle together.

The roof pieces which I started with quite some time ago are now ready to be fixed into place. I find sticking the tiles on can be quite laborious at times, often left as late as possible and often causes me to slow down the work. This time I decided since the model was being built in pieces I could get this done and out of the way first.


I've stuck on the last parts of the towers, including the projecting rear tower. I've also added some triangular supports for this tower which were not in the original design.


The only piece not yet attached is #22 this is the stone column support from the first floor at the front of the building. Since this piece is very likely to get knocked off as I twist and turn the model I'm leaving it to last to attach, so you'll see some photos where I've pinned it in place and others where it vanishes whilst the rest of the framework is completed.


Previous article in this series: Mystery Model - Top Floor


Next article in this series: November Update

Wednesday, 9 July 2014

Mystery Model - Top Floor

The model is growing - the second floor pieces get added on.

Piece #19
The second floor really was a jigsaw puzzle since this one was created in many pieces and I had to refer back to the original photos to try and identify which parts went where.

No I still have not found the book I drew up the original design in and listed all the pieces.

Here we have the central main section (part #3) just above the entrance.


To the right a rear room with its own roof and the front tower continuing up. Between them is going to be a section of just sloping roof.

To the left are parts 15 a rear tower and #19 a sloping extension extending the main section.


Rather than build the internal walls on these I've used strips of foam-board on the interior joins. This gives me something to glue together but does not use the whole sheet of foam-board up on internal walls. The strips I think will give the model enough internal support. They also give me something to hold onto on the inside of the model when twisting it about to work on at different angles.


Previous article in this series: More Wood
Next article in this series: Mystery Model - Completing the Basic Structure

Sunday, 6 July 2014

More Wood

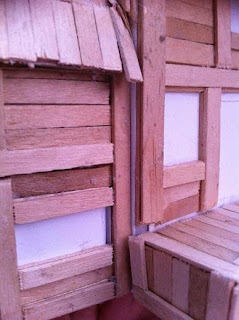
Not a lot to say really, I’ve worked my way around the ground floor of the building. The basic framework has been done and the sections that are just wooden panels. 

The other sections which will include windows and the door will be done later.


This allows me to add on the pieces for the second floor.

Next article in this series: Mystery Model -Top Floor
Previous article in this series: Starting on the Woodwork


Monday, 30 June 2014

Starting on the Woodwork

Thought I’d get one last post in for June, since I’ve managed a few this month. I didn’t get as much done this Sunday as I would have liked, for various reasons. 

One being the need to take some faulty goods back on Sunday morning – and transport on a Sunday is not good taking twice as long to get anywhere. 

After that it was a game of dodge the showers in order to use the garden table to cut the strips of wood for the beams used to build the framework for the ground floor. These beams are made from the old firework rocket sticks stored up since last year.

I started to fill in the panels that are just going to be planking using the good old fashion coffee sticks, but the panels where windows are going to go I’ve left for the time being.  Hopefully I’ll get a chance later in the week to get this basic set of features completed for the ground floor.


Previous article in this series: Piece #7 the Corner Tower.

Sunday, 29 June 2014

Piece #7 the Corner Tower

A quick update from Friday evening, which provided a little time to continue the latest building work. Before I can start putting the wooden beams and planking around the ground floor there is one last piece of the framework to be added. This is the corner tower. 

This has now been attached and the DAS stonework extended around the base to meet up. With the exception of the stone pillar that will support the other corner this is the ground floor structure complete.


The rest of the light granted by the long summer days allowed me to use the garden table to finish the tiles on the main roof structure. This allows me to throw away the remaining biscuit boxes I had put by to allow me to keep the same cardboard for all the tiles.

Next article in this series:
Starting on the Woodwork
 
Previous article in this series:

Monday, 23 June 2014

Mystery Model Takes Shape - Part Two

And the second session on the Mystery Model from Sunday.


Rear view of ground floor
The next piece to get my attention is numbered #4 in the grand scheme of things.

As you can probably guess this is the main roof for the building. Made in the same way as the last roof pieces from foam–board sides with an old cardboard envelope used as the main roof section. I used the existing fold in the cardboard at the apex of the roof. This made cutting the shape and size a bit easier since you are cutting both sides at once from the edge of the envelope.


Roof showing various stages of building


Each of the chimneys is made from two pieces of foam-board off cuts glued together with a V cut at the same angle as the roof slope. These were glued on before I tiled up to them, but were held in place with a couple of pins to allow be to continue work on them.

I then covered them in the DAS putty spread that I had reduced the old block down to, and like the walls, once semi dry I carved in the stones. The tiles are just more of the same small squares cut from the remains of the same biscuit box used previously.


Now comes the exciting bit. Piece #2. Seen here in all its glory. First Floor.

Piece #2 Which up does it go?

I fooled myself when I marked this piece up. I wrote the details and number on upside down. It took me a while to figure out when I went to glue it in place what was wrong. Then it struck me, it was upside down. What seemed to be the top was the bottom, once I had this figured out I was able to glue it in place. This is the main part of the first floor of the building. I wanted to get this in place before I put the wood work on the exterior of the ground floor so that they sit snugly in place.

Piece #2 now fixed in place


(Oh & BTW -  it appears that the local council do not care that they have missed collecting the garden waste from an entire street and we now have to wait another 2 weeks before they can be bothered to have another attempt  - just thought you’d like to know.)

Next article in this series: Piece #7 the Corner Tower.
Previous article in this series: Mystery Model Takes Shape

Sunday, 22 June 2014

Mystery Model Takes Shape

This Sunday was quite a nice day, and since our beloved council failed to collect the garden waste from my street this week my wheelie bin is full preventing me from taking on another of the overgrown bushes. This meant I spent the day working in the garden in a different capacity. Up went the sunshade and out came the Mystery Model. I still have not found the original plans I drew up for this, which went walkies sometime during the winter months when my attention was elsewhere. Fortunately I had taken some photos of the original foam-board construction when I had pieced it together, so I have those for reference still. The advantage of these smart phones where we simply photograph just about anything that does not move these days. (What is with all those plates of food on Facebook and Twitter?)

Piece #1
Anyway I digress. I got a couple of sessions done on the Mystery Model along with a period of rewrites for the final installment in Karl’s story. The Beta Readers are sending their feedback through and I’m responding accordingly.

But you want to know more about the model. Piece number 1 came into play today. This is the main body of the ground floor of the building. It was marked out with a row about 3cm high which has been covered in DAS Putty. 

One of the two corner pieces attached


The reclaimed putty has been turned into something of a paste and with a little PVA glue it has been spread over the bottom part of the ground floor. Once it had dried out a little, I carved the stone effect in. I will certainly be taking the advice offered by Greg, when he commented on the last model post. I had kept it wrapped in its original foil but it was not sealed and not kept in the refrigerator either.  I will certainly remember this for the next packet I open, but I think it’s just a little late for this one. But it is still being used to good effect.

Piece number 5 also stepped forward today. This is the front reception area. It was attached to the front and the brickwork brought round the sides. Pieces 13 & 14 from the other week were attached to the rear of the ground floor making most of the base framework complete. 


There are still a couple of pieces to add yet to really finish the structure of the ground floor.

To allow me to continue working on the model whilst the glue holding the pieces together dried I held them all in place with the old favorite Dressmakers Pins. 


Mystery Model takes shape

Next article in this series: Mystery Model takes Shape - Part Two
Previous article in this series: Mystery model parts #13 & #14

Monday, 2 June 2014

Mystery model parts #13 & #14

The hard brick of DAS putty has spent some time soaking and once it became soft enough I was able to break it down and use it again. 

So time to get started again on the mystery model. 

I’ve misplaced the note book with the designs in but I still know how the model goes together. 


Two ground floor corner pieces are going to be stone work. (These are #13 & 14 on the plan.)

I smothered the pieces with PVA glue then spread the putty over. 


Left it a few minutes to dry out slightly then carved the stone pattern into semi dry putty, then left them to dry out.


It’s not much, but it’s a step in the right direction.


Next article in this series: Mystery Model Takes Shape
Previous article in this series: New Mystery Model, parts #9, #16 & #18


Friday, 23 May 2014

Where has all the time gone?

"Oh My Giddy Aunt," as the Second Doctor was heard to say a few times. It’s nearly half past May and this blog is looking sparser than a, well a 1976 reservoir. 

Sorry, sorry I had planned and intended to be far better this year, but time, tide and stuff...

I’ve been so absorbed in getting the final part of Karl’s trilogy finished everything else has gone by the wayside. No model work has been done, no book reviews written. Although I have been reading and here is the pile of books waiting for the reviews to be penned.

There are a couple in the pile I really want to rave about so I might just cherry pick them out first.

As far as model making goes, that mystery model is still cluttering up the kitchen. I did try to turn my attention to it the other day and went in search of the putty stuff to make some stone walls and it was hard as rock. I couldn't even chisel any off.

However, all does not appear to be lost, I’ve left it soaking for a few days and it appears to be coming back to life. So you never know, I might just get round to it one day soon. But not this bank holiday, this coming bank holiday my attention has to go to getting the garden fence fixed. Grrrrr!!!


So, Karl. First draft is done. I say first draft; it’s the first draft I let my read through team see. It’s more like a third draft. The first always hand written – call me old fashioned but pencil to paper is still the best way for me to get those initial ideas out of my head. Draft two comes when that gobbledegook and illegible scrawl is typed up. The third follows a complete read through and the attack of the red pen. Then others get to see and comment.

Let’s just say I’m already working on the fourth draft...


If you want to know more about what is happening with the books then pop over to Karl’s Facebook page, give it a like and the more likes we get then the more we can do with the page.


Or if you prefer the little blue Twitter bird then give me and/or Karl a follow @djkettlety  for my general weird grumblings or @karlaxilion for book news and Karl’s own occasional messages from Miltonburg.

Catch you soon, and that’s a promise.

Derek

Tuesday, 10 September 2013

New Mystery Model, parts #9, #16 & #18

or “The Pointy Bits”

It’s probably quite easy to guess what these are. 
Pyramid Power


The working names for these parts are:

#9 Front Tower Roof
#16 Rear Tower Roof
#18 Second Floor, Left Side, Rear Tower Roof.


Opposite sides tiled first

This suggests that there are going to be three towers to this model, whatever it turns out to be. I do have plans and designs I’m just keeping them to myself for a little while longer.

These are all made from cardboard, cut from the remains of an Amazon delivery package, and covered in tiles in the same way as the other roof pieces from the small cereal bar box. 


Opposite sides trimmed before adding remaining tiles
That small box has made all the tiles for these pieces so far, but what’s left will not be enough for the main roof piece of the model.


Pieces #9 & #18 were cut out as four matching triangles and glued together.

Piece #16 has two pairs of different size triangles making for a thinner tower rather than the square tower of the other two.


All sides trimmed
I stuck the tiles onto opposite sides and allowed them to dry before trimming the sides up, then I added the other two sides of tiles. 

Once these were dry those sides were trimmed.

So far the best guesses have been:
  • A city ruined by an earthquake.
  • A brothel.


Next article in this series: Mystery model parts #13 & #14
Previous article in this series: New Mystery Model, parts #6, #10 & #12

Sunday, 8 September 2013

New Mystery Model, parts #6, #10 & #12

Three more roof related pieces of the new mystery model today – the weather was a bit windy and rainy so working out on the table in the garden was really not an option. 

This means I usually look for smaller scale pieces to work on and sticking roof tiles is about the simplest option.


These three parts have the working numbers and names as follows:
#6 Front reception roof
#10 Second floor, right side, centre piece
#12 Second floor, right side, rear roof.

Two are triangles of foam board with cardboard roof covered in tiles, whilst the other piece is an L shape made from foam board with a slanted piece of card going partially up leaving a small side of wall exposed.

Piece #12 also has a lip to the roof so that the tiles will over hang the front slightly. This will be to the front of the final building.


The biscuit box is now fully cut up into tiles, it was used on these three pieces and will still have enough for the other three small roof pieces that I’ll be working on next.


Next article in this series: New Mystery Model, parts #9, #16 & #18
Previous article in this series: New Mystery Model section #20


Wednesday, 4 September 2013

New Mystery Model section #20

Here is the first piece of the large mystery model, no I‘m afraid it’s not a city in ruins – not this time, but I might head down that route one day.  

Mystery Model piece #20 plus uncut roof tiles.

This is actually piece numbered 20 on my list of pieces, affectingly known as: SECOND FLOOR, FRONT LEFT SIDE ROOF. It’s basically a rectangle of card approx 135x105mm cut from an old Amazon delivery package, and the tiles are cut from cereal packet, in this case the box for some Nature Valley biscuits.

Roof tiles cut and ready
I do find cutting these tiles and sticking them down quite laborious so I’ve decided to do some of the roof pieces early in the process. The average size of the tiles is 10x10mm but not measured exactly and a few variations to give it some character, but not too much larger. 

The tiles have been cut and glued down and once the glue is fully dry I’ll trim up the overlapping pieces that are sticking out around the edge of the roof plate.


Piece #20 Front Side with tiles added

Piece #20 Reverse side
Next article in this series: New Mystery Model, parts #6, #10 & #12

Previous article in this series: New Mystery Model


Monday, 2 September 2013

New Mystery Model

Just time for a quick post regarding a new project – yes I know there are a few more outstanding to finish. But this is something I’ve been itching to do for a while and I think the time is right having experimented a lot recently on different things. 

You’ll see I’m being a bit vague at the moment, all I will say is that the skeleton has been made from foamboard and cardboard and constructed in sections. 

There are 21 section pieces in total. 

So watch this space.


Next article in this series: New Mystery Model section #20

Wednesday, 7 August 2013

Model Updates

Thought I’d post a few recent photos showing the latest work on these two models, the scrap piece house and the mystery model.


The scrap built house has now been put together and the areas around the joins are being patched up, covered over and generally made to look complete.


For the tall mystery model I’ve started to build a frame work top so that it can be used as a lookout tower. 

I also like the suggestion of a siege tower so will make a small trolley base to sit it on a later date to be able to adapt it. Thanks to Paul at Paul’s Bods for that excellent suggestion.