Showing posts with label fur. Show all posts

Monday, 16 May 2011

Country Cottages, The Thatching

Ok where was I?  (Previously Country Cottages Fireworks and Fur)

Oh yes thatching my cottages and updating my materials used page – but then our dear friends at Bloggerton blew up their system and made a hash of the system restore – yes my page updates have not been restored. Suffice to say, modelling is a hobby, as an IT professional I’m not impressed. Ok moan over, let’s get on with something constructive.

The next stage is to glue on the chimney and the capping stones. The stone and the chimney work are made from modelling clay – I tend to use DAS or similar material for this. I make small stone shapes and glue them to the top of the model sealing the gap between the fur edges.

Then I basically build up the box chimney shape using small pebbles made from the modelling clay, glued on whilst still wet. 


On the cottages where the chimney is built up as an external wall the clay stones are made to fit and are build up over the exterior of the foam board.

One of the other models I have found half finished has a chimney wall like this. I’ll be working on that one next week.


You need to leave the clay work overnight to harden off before sanding down the building to get any unwanted marks off the wood, for example any wall filler that has smeared over the wood. Once the building has been cleaned up then the painting can begin.

The first stage is to give the whole building an undercoat, for buildings where I have thatch work I tend to go back to a white undercoat and spray quite liberally with white paint. (In this case I’m using Skull White from Games Workshop)

Once this is dry I spray the thatch again with a second blast of the skull white and this time whilst wet I lightly sprinkle with saw dust.
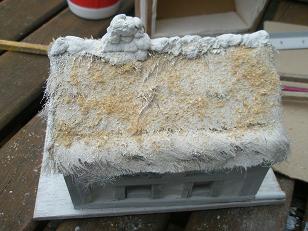

Once this has started to dry off, I then start to add colour, and here you do need to use quite a heavy amount of paint to ensure that the fur is matted together.

This time I’ve used two creamy brown shades from the Americana Decoart Acrylic paint collection, the shade names being Desert Sand and Butter.

This has given a very light and clean colour to the thatch – I will probably do a little dirtying down on my next session.

When painting this I use a large brush and apply very liberally as I have said, also ensuring that the paint is well worked into the edges and front of the fur to stiffen it up and to make it look as much like the ends of cut thatch as I can, pushing the brush into the exposed fur.

Next I gave the stone topping and chimney a black base coat to start the stone work painting.

Next week I’ll dirty up the thatch a bit, paint the stone work in grey shades and then start the on the wood work.

Sunday, 8 May 2011

Country Cottages, Fireworks and Fur

After boxing up some of the recently finished parts of the ruined castle and the ghost town to give me more working space, I uncovered a box of partially completed models.

This included two of the country cottages, I have four completed, pictured here – but I found another two packed away for whatever reason in a just started state.   I’ve dug these out and now intend to finish them off.


Regular readers will have recently seen a tribute piece I wrote for my parents. Once again I must credit mum with two great ideas which feature dominantly on these cottage models, in fact I’m sure it was these ideas that fuelled my drive to use as much recycled materials in my models as I could.

These models start life like most of the other buildings with a foam board skeleton, and cardboard roof.  I was buying a lot of balsa wood sticks to build the models, and then following one Guy Fawkes Night mum retrieved a rocket stick from our garden. Instead of throwing it away she brought the stick in, it was a bit harder than the balsa wood but certainly very similar that it could easily be used in the model construction somewhere.


Now, for the last few years I take a stroll around the streets of Dagenham on the morning following the Guy Fawkes celebrations and gather up as many sticks as I can find. This annual horde provides quite a collection of different sizes and thickness of wood all very suitable for model construction with just an occasional clean up required for a few burnt ends and paper bits glued on.

(Need I emphasise here the firework code, about not returning to lit fireworks?  These sticks have all fallen from the sky once the fireworks have gone bang and all that remains is the wooden stick.)

Last year's horde of sticks

Most of these cut with the craft knife like balsa wood, some of the thicker or harder wood sticks I use a small hand saw. The front of this cottage was built with balsa wood; the other three sides which I completed this weekend have been constructed from firework sticks.

Once the wooden frame has been stuck to the foam board I fill the areas between with the good old modelling favourite the wall filler.


I know from memory that the original cottages were made using the mix it up yourself stuff, but this one I’m now finishing off has been filled using the same ready mix product I’ve been using on the castle ruins.

Now comes the next idea from mum, the thatch roof. I tried a few ideas for thatch none of which appeared to come close – then mum suggested an old (fake) fur hat that wasn’t wanted anymore.

We cut this up and glued it to the roof of the cottages, then cut across the fur in bands to give the fur a layered look. After that the main effect came from the painting.

This time I’ve used some craft fur bought from the hobby store. I’m hoping this is going to come out just as effective, at the moment it looks a bit like a bad wig.

You glue the fur on in separate pieces, one for each side, ensuring that the fur hangs downward on both sides. Using a straight edge I ran a blade along the fur forming layered sections, not cutting right into the fur but enough to make it appear like the fur is like layers of thatching.


The next stage is to glue on the chimney and the capping stones seen in the finished models before giving the whole model a clean up before painting. The true effect of the thatch comes with the paint work.

But that’s next week. Country Cottages The Thatching