Showing posts with label undercoat. Show all posts

Wednesday, 18 May 2016

And so it begins

Now that I have finally succeeded in the annual rediscovery of the back garden, hacking through the undergrowth that looks like a scene from the 'Lift After Humans' DVDs, I can venture forth and start sanding down and painting some of the models built during the cold dark days of winter.

This is not this year's photo, but the scene before and after from a couple of years ago, however it was very much the same.


Hopefully from now on I will not be delayed posting as the problems with syncing the photos from the phone to the laptop have mysteriously gone away (after trying many online resolutions regarding turning settings off and on, deleting profiles and sacrificing chickens - none of which worked) it just started to work without any prompting, just as I was about to resort to manually transferring them.


The first three buildings have been rubbed down and had final fixes made to them, and two of them have now received their base coat, when this is dry I'll check for gaps where crevices need to be touched up before starting the first round of varying shades of brown.


Sunday, 19 July 2015

Haunted Undercoat

Just a quick update this weekend. The haunted house has now been rubbed down and the undercoat has gone on. I used a basic black acrylic paint. This took several hours to cover and used an entire 120ml new tube of paint, plus a couple of squirts from another tube when I was touching up around the windows.


The next job will be to clean any paint off the broken glass, then start painting the stonework around the base.


BTW if you want to try and work out how long this took, add together the running time of these albums: Buffy the Musical + Rent (Original cast recording) + War of the Worlds + Rocky Horror (The Full Gory Story)

Previous article in the Mystery Model / Haunted House series:

Next article in the Mystery Model / Haunted House series:

Sunday, 29 May 2011

Country Cottages - Paint Work Part One

After last week’s trip to the theatre, today I took some time back in the sunshine to work on the cottages, although some windy moments did see me chasing things around the garden.

I've started to paint up the cottage I was working on the other week. Here I’ve pretty much followed the original painting guide for old woodwork I learnt back when I first started, when I built the Coaching Inn following the instructions in the early White Dwarf Magazine.

First stage for the woodwork is to paint it with a black undercoat to give it depth and to help with the aged look.

Then I painted over the black undercoat with Burnt Umber.

After I mixed a fifty / fiftyish mix of Burnt Umber and White paint. This time instead of brushing it on I dabbed it on with a semi dry brush so as not to completely smother the original coat of Burnt Umber.

The last stage (which I’ll pick up later in the week) is to dry brush with white to give the final aged look. I might also pick the door out with a slightly redder brown shade also just to differentiate the different wood used for the door to the rest of the building before I perform the dry brushing.


I also covered the base with sawdust to keep this model in the same style as my original country cottages with bases. To do this I basically covered the base with PVA glue and sprinkled the sawdust on between paint sessions.

Then once the glue was dry I painted over with black, I found it easier to practically squirt the paint from the tube directly onto the base then work the paint over rather than the traditional paint it on approach. This then secures the sawdust from falling off, I will later colour this up with some green paint and green flocking as well.

Monday, 16 May 2011

Country Cottages, The Thatching

Ok where was I?  (Previously Country Cottages Fireworks and Fur)

Oh yes thatching my cottages and updating my materials used page – but then our dear friends at Bloggerton blew up their system and made a hash of the system restore – yes my page updates have not been restored. Suffice to say, modelling is a hobby, as an IT professional I’m not impressed. Ok moan over, let’s get on with something constructive.

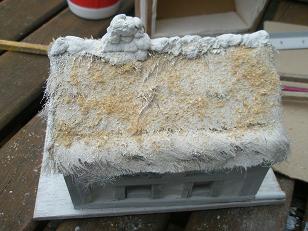
The next stage is to glue on the chimney and the capping stones. The stone and the chimney work are made from modelling clay – I tend to use DAS or similar material for this. I make small stone shapes and glue them to the top of the model sealing the gap between the fur edges.

Then I basically build up the box chimney shape using small pebbles made from the modelling clay, glued on whilst still wet. 


On the cottages where the chimney is built up as an external wall the clay stones are made to fit and are build up over the exterior of the foam board.

One of the other models I have found half finished has a chimney wall like this. I’ll be working on that one next week.


You need to leave the clay work overnight to harden off before sanding down the building to get any unwanted marks off the wood, for example any wall filler that has smeared over the wood. Once the building has been cleaned up then the painting can begin.

The first stage is to give the whole building an undercoat, for buildings where I have thatch work I tend to go back to a white undercoat and spray quite liberally with white paint. (In this case I’m using Skull White from Games Workshop)

Once this is dry I spray the thatch again with a second blast of the skull white and this time whilst wet I lightly sprinkle with saw dust.


Once this has started to dry off, I then start to add colour, and here you do need to use quite a heavy amount of paint to ensure that the fur is matted together.

This time I’ve used two creamy brown shades from the Americana Decoart Acrylic paint collection, the shade names being Desert Sand and Butter.

This has given a very light and clean colour to the thatch – I will probably do a little dirtying down on my next session.

When painting this I use a large brush and apply very liberally as I have said, also ensuring that the paint is well worked into the edges and front of the fur to stiffen it up and to make it look as much like the ends of cut thatch as I can, pushing the brush into the exposed fur.

Next I gave the stone topping and chimney a black base coat to start the stone work painting.

Next week I’ll dirty up the thatch a bit, paint the stone work in grey shades and then start the on the wood work.

Monday, 25 April 2011

Project Round Up – Easter Monday

Well, the Easter holiday is nearly over, at least I have managed to get some model work done each day. Today was quite a busy day model wise, with the sun shining down and ‘Big Finish Doctor Who’ audio book CDs playing in the background I got quite a lot completed.

Castle Ruins – Castle Entrance.

The left hand side of the entrance has now been completed, leaving only a small part of the roof near the murder holes to be completed before I start painting.

Castle Ruins – Partial Room.

This is the last piece of the castle ruins that I had originally planned, and I had the polystyrene skeleton cut out for a while now.


This piece gives me a partial room with a doorway, on a higher level, with a set of steps leading up. The steps have been built from odd pieces of polystyrene, glued in a spiral set of steps, once covered in wall filler these will be much sturdier than they are now.

I have reinforced the top level join with a couple of cocktail sticks inserted into the top step and the main body piece. 

Today I started to cover the first couple of walls then decided that the whole thing was too box shaped still so broke out two lumps from the remaining sides.

I think this will give a better result in the end. These odd pieces will be made up to be small wall fragments for general placement on the overall layout.


Coffee Stick Ghost Town.
After looking at the paintwork from yesterday I decided that the models did not need a second coat of burnt umber before I added the lighter shading, so I started today with a 50–50ish mix of Wilkio’s Burnt Umber and Americana’s Desert Sand.  Both are acrylic based paints. I picked up several different bottles of Americana paint from a recent clearance sale at the local branch of Hobbycraft. (I try to pay regular visits to as many hobby shops that have clearance bins, as you never know what you might find.)

I lightly coated the two models with this lighter brown mix, then once dry I dry brushed with the same acrylic white I bought at the local pound store which I’ve been using on the castle ruins to give that aged weathered look to the wood work.

These two models have come out a lot darker than the original two coffee stick buildings I made; I actually prefer this colour scheme and will probably keep to this when I make a few more of these models. I think the town needs a few extract smaller models to go along with the three large ones that dominate the one smaller model at the moment.

All these models have had their windows painted black; this is quite a neutral design so that I can always add additional effects later.


After, I gave all four of the coffee stick ghost town buildings a quick spray with Games Workshop’s purity seal. The other two have been waiting a while over winter for their spray, as I try to do this outside when the weather is better.


Saturday, 23 April 2011

Project Round Up - Saturday

Not much model work today – priority was the new series of Doctor Who, and getting past a technical problem with receiving the broadcast. If you’ve not seen it yet, then I won’t give away any ‘Spoilers’.


Today I finished off the wood work on the larger coffee stick house that was in production and gave it a quick rub down with sand paper before applying the undercoat using Games Workshops’ Chaos Black spray. That was out in the garden, and then came the thunder and then the rain – so game over.