Showing posts with label burnt umber. Show all posts

Saturday, 13 August 2016

Varnished At Last

It’s been a long time coming, but finally the haunted house has been varnished. Last weekend, after blowing up the mower, I decided that Sunday would be dedicated to the models, weather permitting. 

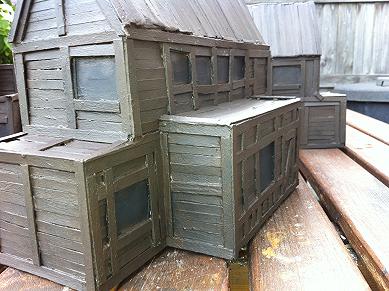
Fortunately the weather was, quite breezy but warm, so with the shade up I finally got the mother of all varnish jobs finished. After a few hours with the tin of varnish and the brush the haunted house is now all but complete. 


The only thing left is to reattach the stone ‘support’ pillar which keeps coming off. I also got four of the larger ghost town models that had been recently painted up varnished as well in the mammoth session. 

The painting of these had not gone as well as I would have liked. The Wilko paint I had been using for ‘Burnt Umber’ has been changed since I originally discovered it. 


Although the tube are much larger, so more paint yay! this new version of Burnt Umber has come out more redder than before and I was forced to add a lot of additional black and white into the mix to tone it back to the darker wood effect I had previously taken to.


With Hobbycraft having had a special offer running this month on their acrylic paints I have taken the opportunity to pick up a selection of black, grey, white, umbers and others from their range and will be trying those out soon. 

Meanwhile, whilst the mower was blowing up, I’ve also suffered a hard drive failure, some data was recoverable from backups but other data wasn’t. Hence the blog silence for a bit. I have however made good progress on the tapestry and will be posting some new photos soon. 

(Oh and I not mention the boiler... They say things come in threes so I hope that’s me off the hook for several years now please!!!)


Monday, 6 June 2016

June Update

Thought I would share a quick update on some of the models that have been gathering on the workbench.

The four larger additions to the coffee stick ghost town have all now been undercoated and have received their first round of brown shading, the burnt umber & black mix. Next stage for these will be the burnt umber layer.


The other smaller buildings are beginning to start taking shape. These have all been given roofs which have been tiled with tiny pieces of cut cardboard. Chimneys cut from foam board off-cuts which will be covered in putty and the rest wooden exterior walls.


And finally this one, with cardboard shuttered windows – still not quite sure about them, but we’ll see. The wooden overlapped roof has now been finished.


Tuesday, 19 June 2012

Ghost Town - Curved Beams and Paint Work

To be honest I was surprised by the lack on comments on the previous posting, I expected at least one ‘I told you so’.

I did promise to mention how I fixed the curved pieces to the round walled building. These coffee sticks will bend easily when wet. 

Soak the sticks for a while then test them, if they feel supple enough you can curve them. If not, leave them to soak longer, using hot water also helps. I bent these when I was cleaning some more sticks I had brought home.

For cleaning I use boiling water, although I did let it get a bit cooler before working with the sticks in this case.


I curved the sticks around the outside edge of the building, then clamped them to the edge and left them to dry held in place. Once dry they retained their curve and I was able to glue them to the various positions at the top, middle and bottom of the curved wall.

Finally the top one was held in place by an elastic band as the glue dried.

Some progress has been made on these ghost town buildings, they have now finally been sanded down, and have been given four layers of paint. 


The first was the black primer which was a pain to go on in the window areas where some of the shiny card had been allowed to show through. 

Eventually this was followed by a black and brown (Burnt Umber) 50/50ish mix. These first two layers have to be almost scrubbed on to ensure that all the nooks and crannies are covered. The final layer so far is the pure burnt umber. 

This is just painted on quickly going where it touches, in other words deliberately making sure not to work it into the corners so that the aging effect of the darker under layers show through. 

After that it was a white / burnt umber mix. I cannot be very specific as to the proportions of this as I used some left over white paint from a previous project which I had prepared too much of.

(Previously I squirted too much white paint out a few days ago.  Thought I would lose it, but I managed to keep it fresh by covering the ‘Pringles’ tub lid I use as a paint pallet (Idea nicked from BigLee) with a ‘Tu’ desert pot. It just so happens that a ‘Pringles’ lid snugly fits these glass pots)


This mix of paint I quickly dry brush /scrub over the entire building to give a mottled look. I work quite quickly with the brush working the paint over, ensuring I keep as best I can to the direction of the wood, but ensuring that the paint is very thin on the brush. 

For the building with the curved wall I used an old number 2 brush that has seen better days. For the more flat buildings with larger cover areas I went with an even larger brush.


And finally, this week's teaser from the book. Quite a short one this time.

.... She threw the skull to the floor; it shattered into a million pieces as it hit the chains. 

Now if anyone tried to alter any of her spells they would die. The casting was over. Zandina screamed, her vision turned to a dark red then to blackness and she collapsed onto the floor....


To order your personal copy please follow the link below. You'll need a Paypal account to order. Although Amazon is showing it as unavailable I can promise that copies are available to order by going direct to Hundred Publishing. http://www.hundredpublishing.com/derek.html


Sunday, 29 May 2011

Country Cottages - Paint Work Part One

After last week’s trip to the theatre, today I took some time back in the sunshine to work on the cottages, although some windy moments did see me chasing things around the garden.

I've started to paint up the cottage I was working on the other week. Here I’ve pretty much followed the original painting guide for old woodwork I learnt back when I first started, when I built the Coaching Inn following the instructions in the early White Dwarf Magazine.

First stage for the woodwork is to paint it with a black undercoat to give it depth and to help with the aged look.

Then I painted over the black undercoat with Burnt Umber.

After I mixed a fifty / fiftyish mix of Burnt Umber and White paint. This time instead of brushing it on I dabbed it on with a semi dry brush so as not to completely smother the original coat of Burnt Umber.

The last stage (which I’ll pick up later in the week) is to dry brush with white to give the final aged look. I might also pick the door out with a slightly redder brown shade also just to differentiate the different wood used for the door to the rest of the building before I perform the dry brushing.


I also covered the base with sawdust to keep this model in the same style as my original country cottages with bases. To do this I basically covered the base with PVA glue and sprinkled the sawdust on between paint sessions.

Then once the glue was dry I painted over with black, I found it easier to practically squirt the paint from the tube directly onto the base then work the paint over rather than the traditional paint it on approach. This then secures the sawdust from falling off, I will later colour this up with some green paint and green flocking as well.

Sunday, 24 April 2011

Project Round Up - Easter Sunday

Today I was off playing the Easter Bunny and delivering chocolaty goodness, and other treats. So the only thing I got done today was the first brown coat of paint on the coffee stick houses. I’m determined to get these done.


I used an acrylic paint from Wilkinson’s. This is the first time I’ve used any of their paint on a large scale. This is ‘Burnt Umber’ which is a very dark brown, and dries even darker. The important thing to remember when painting such a large area like this is to make sure after you've worked the paint into the gaps that the final brush strokes go in the same direction as the wood.


I suspect I will need to give the models a second coat before I start mixing the paint with white and adding the dry brushing effects. I’ll leave the paint to dry overnight and take a judgement call in the morning.